Introduction + base TOR setup
TOR is a network that allows (relatively) anonymous internet usage (and for free, too) - as well as accessing the special TOR-only websites called onions. To get involved, find the TOR package in Gslapt / slapt-get / slackpkg and install it; take note of the version since newer ones might require newer libevent, etc. The one from your main repo should suffice if you didn't do too many modifications to the base distro, otherwise you're going to have to figure it out (0.4.2.7 works in Salix 14.2 and presumably Slackware 14.2). You can also use slapt-src to install the newest version (0.4.7.8 as of writing, needs 15.0 repository added to /etc/slapt-get/slapt-srcrc); it will work fine on 14.2 when done that way. The default TOR configuration requires a separate user and group for running the daemon - so let's create them. It doesn't seem that the gtkusersetup GUI allows us to do everything we want to so we will just use the command line. Type this:
sudo groupadd tor; sudo useradd tor --gid tor --base-dir /var/lib/ --system --no-user-group --shell /bin/false --comment "TOR Daemon"
The group is created by groupadd
and then the user by useradd
; --gid
option adds him to the tor
group as main. The GUI would not allow us to create a system user, while the --system
option does. This avoids clogging up the /home folder as well as requiring to give the tor user a password (ugh).
Now type these commands: sudo chown
-R tor:tor /var/log/tor
, then sudo chown -R tor:tor /var/lib/tor
and finally sudo chown -R tor:tor /var/run/tor
. This will make the newly created user the owner of some directories TOR requires, so that he has the sole permissions to use them. Now edit the TOR config file /etc/tor/torrc and ensure that these lines are somewhere in there uncommented (no #
signs before); use Ctrl+F to find:
DataDirectory /var/lib/tor
User tor
PidFile /var/run/tor/tor.pid
If the #
sign exists before any one of those, remove it. This will make the directories that we've just made owned by the tor user the "bases of operations" (instead of clogging the home directory that's apparently the default?), and ensure that the daemon is run by the actual newly created user (security advantage). To run TOR on every system startup, ensure the file /etc/rc.d/rc.tor is permitted to execute (sudo chmod +x
); you can also enable and disable services through the GUI by clicking the start menu -> System -> System Services or typing sudo gtkservicesetup
.
System-wide TORDNS setup
Now scroll down to the bottom of the config file and add these two lines:
DNSport 53
AutomapHostsOnResolve 1
This will allow you to use TOR as the DNS server later, preventing your ISP from knowing which sites you visit. To finish this process, put this line: nameserver 127.0.0.1
into your /etc/resolv.conf file as the only one. This is what actually decides which DNS server your computer uses. Remember to make the file unmodifiable, since otherwise dhcpcd will insert the ISP's DNS servers there on reboot, destroying your anonymity. Put nohook resolv.conf
into /etc/dhcpcd.conf (my preferred option) or type sudo chattr +i /etc/resolv.conf
into the terminal. This will also allow all the software on your computer to resolve onions regardless if they have a setting for it. By the way, Pale Moon and FF-based browsers have a dumbfuck about:config setting called network.dns.blockDotOnion
that has to be set to false
to be able to resolve onions (and the default is true
for fuck's sake).
Configuring programs to use TOR
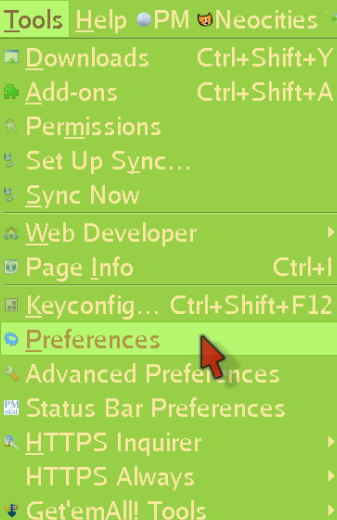
Anyway, let's learn how to set a program to connect through TOR (we will use Pale Moon as an example). First, click Tools and enter the Preferences menu:
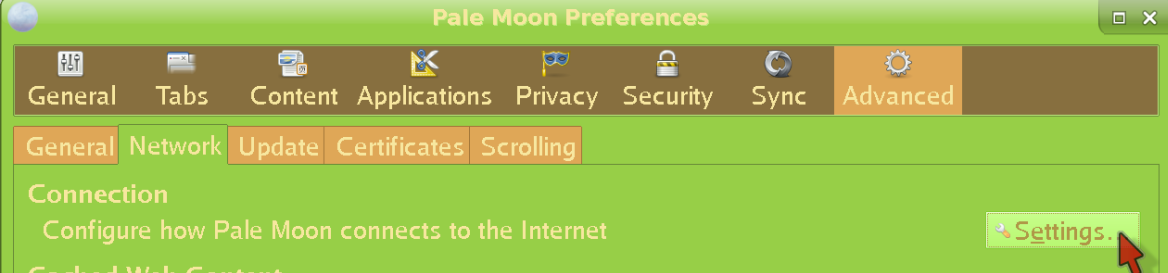
Now click Advanced, then Network, and finally Settings:
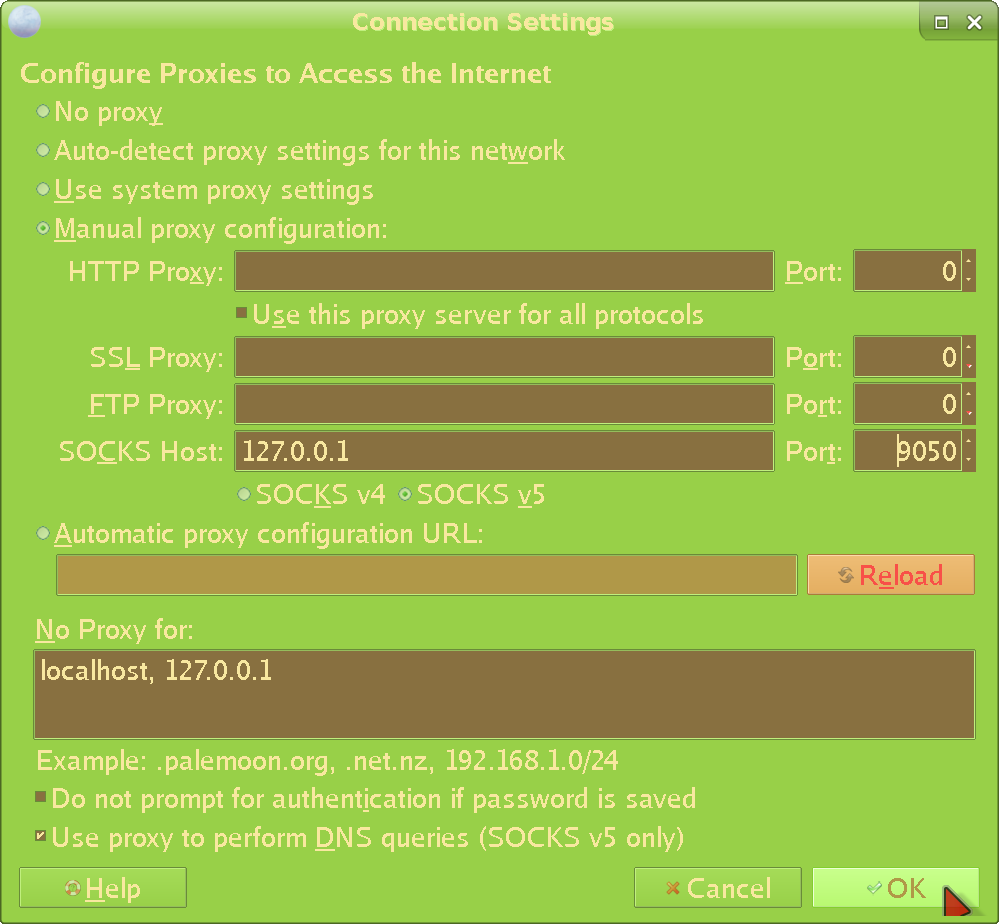
Fill everything as shown:
There are a few problems with doing things this way, though (but I'm including it for completeness' sake). First of all, many programs lack proxy settings completely (e.g most terminal ones), which leaves you fully naked. Then - of those that do have them - they leak (as in, attempt to do stuff in the clear under certain conditions). I've discovered this for at least a few commonly used programs including Pale Moon itself. And third - even if the main proxy connection did not leak - it is rare to see an option to proxy the DNS, as well. Therefore, the ISP will know what you're doing either way (though we've already immunized ourselves against that with the system-wide TORDNS above). I think it's still worth it to do so for all programs that support it - there's never enough defense. And sometimes (new / broken installs, etc), you just don't have access to the more advanced methods, so this has to suffice. Still, this is clearly not even close to enough, so we're going to support our setup with an a lot more effective method:
Using proxychains
Enter proxychains, which allows us to route anything through TOR. Install it with a command like sudo slackpkg install proxychains
or sudo slapt-get --install proxychains
depending on which package manager you use. 4.14 works on vanilla Salix / Slackware 14.2 so there's no need to worry about that. The whole point of proxychains is that you don't need to rely on those unreliable settings. It also allows programs that lack the ability to set a proxy to still be sent through TOR. Edit the config file /etc/proxychains.conf so that the line:
proxy_dns
Is uncommented (no # sign). Though the system-wide TORDNS should protect us already, we need as much defense as possible (what if the ISP's DNS servers wind up in resolv.conf somehow, like if you forget to make it unmodifiable or remove it / reinstall dhcpcd for some reason, etc?). Also ensure that the line:
socks5 127.0.0.1 9050
Is there at the bottom. This actually decides where to "send" an application that you decide to proxify; which we have obviously defined to be the TOR proxy.
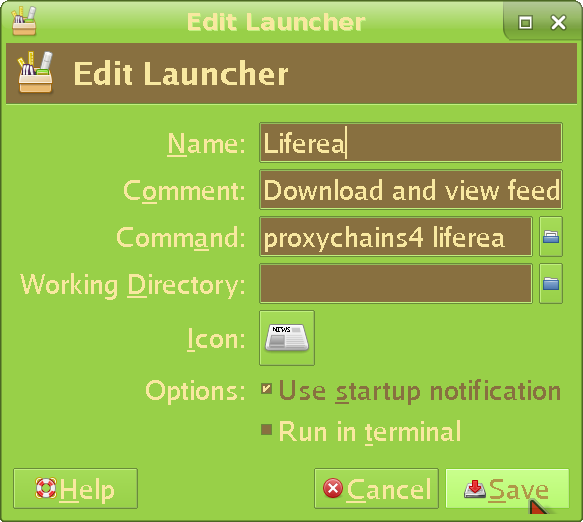
Proxychains is executed like this: proxychains4 filezilla
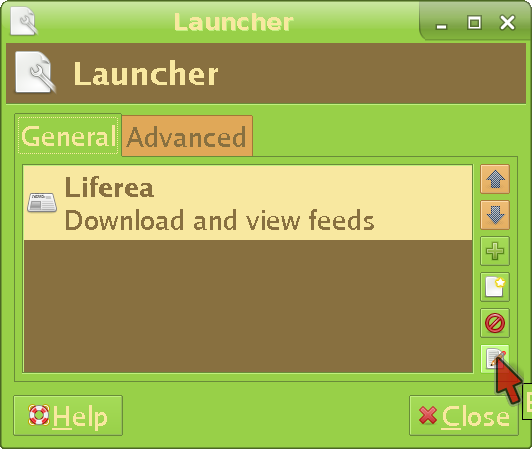
(replace filezilla with the program you want to launch). Learn to run everything through it, because again, inbuilt settings leak shit almost always. If you are using xfce like me, you will need to edit your panel launchers like this:
What about command line programs? You're either going to have to type the full command every time (unreliable and annoying) or put the following lines into the file /home/your_username/.bash_aliases:
alias sli= "sudo proxychains4 slapt-get --install"
alias sls= "sudo proxychains4 slapt-get --search"
alias srcs= "sudo proxychains4 slapt-src --search"
alias srci= "sudo proxychains4 slapt-src --install"
alias whois= "proxychains4 whois"
alias yt-dlp= "proxychains4 yt-dlp"
The left part (before "= ") is the "shortcut", the right one (after "= " ) is the actual command run. And so, every time you type sls
it will run the command slapt-get --search
through proxychains - so you don't have to remember to type proxychains4
before every command every time if you just remember the shortcuts. You should set up a proxychains alias and / or launcher for every program you use that connects to the internet. Since if you forget to run something through proxychains, there is a risk that the software will expose your beautiful bare IP /s. Hey, apparently proxychains itself is not a perfect solution (archive) (MozArchive), either:
The way it works is basically a HACK; so it is possible that it doesn't work with your program, especially when it's a script, or starts numerous processes like background daemons or uses dlopen() to load "modules" (bug in glibc dynlinker).
Though proxychains is a lot better than the inbuilt proxy settings of applications (which I've already proven to leak many times; it doesn't seem like programmers care too much about anonymity) - it still does not protect us from ourselves running something in the clear; and if you run a bunch of terminal commands every day, the probabilities are way against you even with the aliases. Fortunately diggy has prepared a method perfect for us schizophrenics careful people. But first, let's set up another darknet, which can also be used later with that method:
I2P in Slackware
I2P is yet another darknet, more concerned with internal usage than reaching the clearnet (like TOR does), and addressing some of TOR's weaknesses (archive) (MozArchive). If you want to get in, you will first need to install i2pd; there are no packages that work in 14.2 so you will have to compile if using that version. For that, you will need to have cmake version 3.21.4 and boost version 1.78 (older versions do not work) already installed. Type sudo slapt-src --install i2pd:2.46.1
for the newest version (needs 15.0 repos added to /etc/slapt-get/slapt-srcrc). If successful, move the shipped config file from /usr/doc/i2pd-2.46.1/i2pd.conf to /etc/i2pd.conf. Edit it and uncomment these lines:
# tunconf = /var/lib/i2pd/tunnels.conf
# tunnelsdir = /var/lib/i2pd/tunnels.d
# pidfile = /run/i2pd.pid
# logfile = /var/log/i2pd/i2pd.log
# daemon = true
# port = 4567
In the third line, also change /run to /var/run/i2pd, ; we will need a separate folder to store the I2P pid file so that we can make it owned by the i2p user. Also make the port number something else as the config file tells you to. If you want to, you can also find the line ipv6 = false
and change it to true
to allow ipv6. Now type these commands:
sudo mkdir /var/lib/i2pd; sudo mkdir /var/log/i2pd; sudo mkdir /var/run/i2pd
This creates the folders i2pd will use. Next, create the i2p user and group that will run the daemon (same thing we did in the TOR section):
sudo groupadd i2p; sudo useradd i2p --gid i2p --base-dir /var/lib/i2pd --system --no-user-group --shell /bin/sh --comment "I2P Daemon"
We're giving him a real shell since i2pd (unlike tor) does not support downgrading privileges, so we will have to su into the user to run it - which would not have been possible with a false shell. Now move the other necessary files to the folders used by i2p (I don't get why all this isn't done automatically, but whatever):
sudo cp -R /usr/doc/i2pd-2.46.1/tunnels.d /var/lib/i2pd/; sudo cp /usr/doc/i2pd-2.46.1/tunnels.conf /var/lib/i2pd/; sudo cp -R /usr/doc/i2pd-2.46.1/certificates /var/lib/i2pd/
Modify the ownership of the relevant folders and files:
sudo chown -R i2p:i2p /var/log/i2pd; sudo chown -R i2p:i2p /var/lib/i2pd; sudo chown -R i2p:i2p /var/run/i2pd; sudo chown i2p:i2p /usr/bin/i2pd; sudo chown i2p:i2p /etc/i2pd.conf
And the permissions (no need to give any other user access at all):
sudo chmod 700 -R /var/log/i2pd; sudo chmod 700 -R /var/lib/i2pd; sudo chmod 700 -R /var/run/i2pd; sudo chmod 700 /etc/i2pd.conf; sudo chmod 700 /usr/bin/i2pd
Switch to the user that's going to run the daemon:
sudo su i2p
Now actually run it:
i2pd --conf /etc/i2pd.conf --datadir /var/lib/i2pd/ --certsdir /var/lib/i2pd/certificates/ --service --daemon
The reason we're doing it this way is because it's just the most secure, not allowing any random application to access the i2pd files / folders. Later it will also allow us to let through the I2P traffic through the firewall (just as the TOR setup did above). To test if I2P works, set the HTTP Proxy in your browser to 127.0.0.1 port 4444 (this is the default). Then try to connect to any I2P site, such as mine at http://dv2recs7spoc4vquwnt7gotljvot34i4am4xqsfslhfvdymgjfoa.b32.i2p. If it displays, I2P works. To automatically switch to I2P for I2P sites and browse others as normal, use the addon Proxy Privacy Ruler with *.i2p
inserted in its Domain list
. You can do more things with I2P, such as connecting to XMPP servers that support it, or even host your own. I won't cover it for now, though.
Blocking all non-darknet traffic
The third line of defense - and the most important one - will let through only TOR (or additionally I2P) traffic. There are two ways to accomplish this - iptables and nftables - so let's just move on to the first one:
With iptables
I prefer this over nftables, since that one pulls more random dependencies (while iptables is installed by default already) and doesn't really have an advantage. Just type these commands:
sudo iptables -F OUTPUT
sudo iptables -F INPUT
sudo iptables -A OUTPUT -j ACCEPT -m owner --uid-owner tor
sudo iptables -A OUTPUT -j ACCEPT -o lo # used to allow traffic over the loopback device and is completely safe.
sudo iptables -A INPUT -i lo -j ACCEPT
sudo iptables -A INPUT -m state --state ESTABLISHED -j ACCEPT
sudo iptables -P OUTPUT DROP
sudo iptables -P INPUT DROP
sudo iptables -P FORWARD DROP
sudo ip6tables -F OUTPUT
sudo ip6tables -F INPUT
sudo ip6tables -A OUTPUT -j ACCEPT -m owner --uid-owner tor
sudo ip6tables -A OUTPUT -j ACCEPT -o lo # used to allow traffic over the loopback device and is completely safe.
sudo ip6tables -A INPUT -i lo -j ACCEPT
sudo ip6tables -A INPUT -m state --state ESTABLISHED -j ACCEPT
sudo ip6tables -P OUTPUT DROP
sudo ip6tables -P INPUT DROP
sudo ip6tables -P FORWARD DROP
I won't pretend to have come up with this; the commands are actually stitched together from here (archive) (MozArchive). What this firewall actually does is block any connections that don't come from the user tor. And because the tor user only runs the tor process, it effectively blocks anything non-TOR. After inputting the commands, you need to save them to files so that they can be loaded on every boot. Create a folder where these files will be put, for example with the command sudo mkdir /etc/iptables
. Type sudo iptables-save > /etc/iptables/darknetonly.conf
and sudo ip6tables-save > /etc/iptables/darknetonly-ipv6.conf
. Now edit /etc/rc.d/rc.local and insert these lines:
iptables-restore /etc/iptables/darknetonly.conf&
ip6tables-restore /etc/iptables/darknetonly-ipv6.conf&
Ensuring the rules are loaded up on every system boot. To check if that actually happens, type sudo iptables --list-rules
after reboot. The result should be something like this:
-P INPUT DROP
-P FORWARD DROP
-P OUTPUT DROP
-A INPUT -i lo -j ACCEPT
-A INPUT -m state --state ESTABLISHED -j ACCEPT
-A OUTPUT -m owner --uid-owner 217 -j ACCEPT
-A OUTPUT -o lo -j ACCEPT
If you see the above, then non-TOR traffic is properly blocked. If there are only the first three, then the rules have not been loaded and there is no protection against rogue apps or user error. To more directly check if the blocking works, try a command in the clear such as wget --timeout 60 https://digdeeper.club
. If the setup is proper, the connection should fail in 60 seconds with an error such as failed: Connection timed out
. If the request went through - and the website downloaded - you have a leak (note, however, that the DNS request will go through regardless, because we have TORDNS system-wide). Adding proxychains4 in front of the wget should let the connection go through (you will get a message like [proxychains] Strict chain ... 127.0.0.1:9050 ... digdeeper.club:443 ... OK connected.
)
To add I2P to this setup, we'll be doing the same thing as with the TOR daemon - allowing the I2P-specific user to get through the firewall (one reason we've created one, anyway). Type these commands:
sudo iptables -A OUTPUT -j ACCEPT -m owner --uid-owner i2p; sudo ip6tables -A OUTPUT -j ACCEPT -m owner --uid-owner i2p
Remember to re-save the rules so that they're active on reboot.
With nftables
You can also do the same with nftables - which you're going to have to install (you need a newer version since the older ones lack certain essential commands). If you're not already running the newest Slackware, nftables will probably pull glibc / openssl upgrades (which will break your OS - beware) as well as other stuff. Follow a proper guide (local) to upgrade your Slack, or don't bother and go with the earlier iptables setup. Anyway - if you insist on nftables and have been using any setup dependent on iptables (such as the one above or the VPN ufw setup) - you're going to need to burn your old rulesets with iptables -F
and iptables -X
(they'd still be active otherwise and interfere with what we're trying to do here). Next, create a config file such as /etc/nftables/toronly.conf and fill it with:
flush ruleset
table inet restricted {
chain inbound {
type filter hook input priority filter; policy accept;
ct state {established, related } accept
iifname "lo" accept
ip protocol icmp icmp type echo-request accept
reject with icmp port-unreachable
}
chain outbound {
type filter hook output priority filter; policy accept;
oifname "lo" accept
oifname "eth0" meta skuid tor accept
oifname "eth0" tcp sport 22 accept
reject
}
chain forward {
type filter hook forward priority filter; policy drop;
}
}
Every instance of eth0
has to be changed if using other interfaces, such as wlan0. The tor
in oifname "eth0" meta skuid tor accept
is the name of the user that runs TOR (you can also substitute a numerical user ID). Anyway, after writing down the configs, load them with the command sudo nft -f /etc/nftables/toronly.conf
. Put that command into one of your startup scripts like /etc/rc.d/rc.local.
You can also add I2P to this setup. For that, you will need to add the i2p user to the nftables config file, by replacing the line: oifname "eth0" meta skuid tor accept
with oifname "eth0" meta skuid {tor, i2p } accept
. Be careful while doing any of this. Have those users run ONLY their designated daemons! If you run another program as those users (or add another user to the whitelist), that program or user will be allowed internet access, threatening your anonymity.
Summary
With either of these setups (iptables or nftables), even if an application's proxy settings leak. Or if proxychains itself leaks. Or if you stupidly let the DNS servers change or run something bare. None of this will matter because the firewall rules will block it all. At worst, you will end up with an application that can't do anything (which means the fortress has kept it out - exactly as we want). I've used these setups for long enough now that I can say with high confidence that they are leakless.
Anyway, the full darknet setup obviously provides a significant increase in anonymity compared to the VPN one (and is free), but comes with a price. It is a lot slower, for one. All UDP packets are blocked so forget about torrenting, you dirty little consoomer, you. Oh, and Cloudflare will bully you mercilessly. Even WHOIS blocks TOR (edit: actually, this is only sometimes, so you can proxychains it). I am warning you, this setup is only for true darknet enthusiasts. However, it's not so bad - you get used to it quick, like to uMatrix. And the rewards are worth it.